I hope you're making the best of this rainy weather we've been having the past few days. If you're anything like me, then you know what I mean when I say I really haven't wanted to do anything ...however, I do get bored easily so I figured 'ya know what? I'm not doing anything, not going anywhere, and I could use some chocolate. But I didn't want just plain chocolate. No...it had to be chocolate and...because and is always better than or....at least that's what the new Ford commercial says :) And since it was also my girlfriend Kathleen's birthday I decided to ask her what her favorite candy bar was. She replied either Milky Way or 3 Musketeer's. Obviously you know which way I went. So then was decided what cupcakes were to be had :) When I first started baking many years ago I attempted to make these cupcakes and lets just say I've had better. So there was definitely a little personal goal to make sure these delicious little nuggets were fabulous.
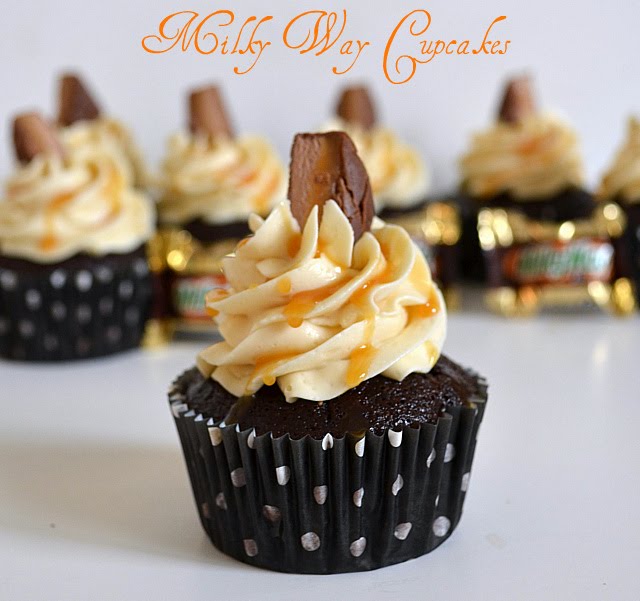
Yummy, right? Yes indeed-ey they are! Chocolate cake, filled with Chocolate Marshmallow Filling, frosted with a Caramel Buttercream, drizzled with Caramel sauce, and finished with a Milky Way on top. Can you say 2 please?! I mean they're practically gone already! This recipe calls for 12, although I get about 15-16 which is great because then you have some to taste and some "left over" that you could eat or eat :) Don't worry, no one will judge you. And if they try to well then no cupcakes for them so I suppose next time they'll know better. Last time I posted cupcakes I took you through the whole process picture by picture with my Candy Land Cupcakes which you seemed to like, but the cake part of these cupcakes are so easy I know you don't need them. I did however take some and will take you through the filling of the cakes.

I use this recipe for every chocolate cake I make, its moist, flavorful, dense enough to hold up without being too hard, and soft without crumbling apart in your hands. Since these cupcakes are filled, there are some added steps to the assembling process, and if you don't have a plunger that's okay there are other methods to extracting the center of the cake. For instance you can simply take a thin knife and cut a hole out of the middle, just make sure you don't go all the way down and cut the paper. The plungers are inexpensive, less than $5 and they make you're life so much easier and cleaner, plus it provides a more uniform look and taste throughout. Okay enough talk and more recipes you have things to do I'm sure!
Chocolate Cupcakes
adapted from Bakers Royale makes 16
Add flour, cocoa powder, sugar, baking soda, and salt in a bowl and mix thoroughly to combine. Add in the butter, eggs, and vanilla and beat on medium speed for one minute. Add half of the coffee into the mixture and beat for 20 seconds. Scrape the sides of the bowl and add remaining coffee. Beat for 20-30 seconds until the batter is smooth. The batter will be thin enough to pour. Divide it evenly among the lined cups. Bake 15 minutes just until a toothpick inserted into a few of the cupcakes comes out clean. Set the pan on a rack to cool.

After your cakes have cooled, you'll need to take out the center. This is what that should look like if you have a plunger. I know you're surprised mine is pink aren't you? :) Except you cant even tell in this picture. Oh well. Just know that it's pink :)
Again, if you don't have one of these you can always use a knife. Next if you haven't already made your filling, you'll need to do that now and stuff these babies full of ooey gooey goodness.
Chocolate Marshmallow Filling
12 ounces milk chocolate
2 Tbs water
1/4 cup heavy cream
In a microwave safe bowl, add the milk chocolate and cook in 30 second intervals until melted. Once melted, add in the water and the cream and mix until well combined. Set aside.
*You could also use a double boiler for this but you'll need it later for your frosting, so if you don't feel like cleaning it then you can do it this way and it works just fine.

This is what they should look like after you fill them. Some people say you should save the inside that you took out and cap off the filling, but you really don't need to as long as you make sure you fill them enough so they run parallel with the top of your cakes. If you don't, then your frosting will sink, but you can always add more to the center if you notice it sank a little, which it will after it sets in, but that's right away. I used baby spoons to fill the holes, they hold just the right amount, and fit into the center without tearing into the sides of the cake. Its perfect. But if you don't have a baby or baby spoons around the house don't worry, regular spoons will work fine too. Good huh? You want to eat that filling don't you? It's okay. I don't blame you. I did it. I have no shame :)

Caramel Buttercream Frosting
adapted from Martha Stewart
1 cups sugar plus 2 Tbs, divided
1/4 cup water
1/4 cup heavy cream, room temperature
4 large egg whites, room temperature
1 1/2 sticks unsalted butter, softened, divided
1 tsp pure vanilla extract
Combine 1/2 cup plus 2 Tbs sugar and water in medium saucepan. Bring to a boil, stirring to dissolve sugar and then leave alone until it turns a deep amber color. Quickly remove from heat and slowly pour in the heavy cream while whisking until completely smooth. Be careful when you do this, if you add the cream too quickly or it's too cold, it will ruin the caramel and you'll have to redo it.
In a double boiler, or in a bowl set over a pot of boiling water, whisk the remaining 1/2 cup of sugar with your egg whites, and stir continuously until a candy thermometer reads 160 degrees F. It's important to keep stirring so the egg whites don't cook. Transfer the egg whites and sugar to stand mixer fitted with the whisk attachment or to a separate bowl and using a hand mixer, mix until stiff peaks form and mixture has doubled in size. If using a KitchenAid, set it to number 8, this will take approximately 10-12 minutes.
Add butter, one tbs at a time, whisking well after each addition, until all the butter has been used. Your frosting will eventually look curdled, its okay just keep going, it will smooth out again. After you have used all the butter, add the vanilla and mix, then add in the cooled caramel and whisk until completely incorporated, about 3 minutes. Frost as desired.

Cut open your delicious creation or dive right in, whatever you choose you'll be sure to love it I'm sure! Here's the finished product above so you can see what it looks like, isn't it a sight!? Yum!
Please let me know if you try this and what your thoughts are, I'd love the feedback! As always, thank you for visiting and Have A Sweet Day!
Now these look really, really good. I think I just gained a couple pounds looking at the photos.
ReplyDelete